Drawing basic facial expressions is not the hardest. Most people can draw a sad face, a happy face, angry etc., but making more multidimensional expressions is more of a challenge. I have gotten a lot of compliments on how I draw facial expressions, (specifically “angsty ones”) telling me that they are very dramatic and well… expressive! And there are actually only a few things I think about when I draw faces that take them to the next level, so I thought i’d illustrate them all here!
SUPER IMPORTANT TIP BEFORE WE START: Look at your own face when you draw faces. Even making the face when you are drawing (you don’t even have to look at it), will give you some sense of how the face muscles pull and where things fold and stretch, because you can feel it. You are the best reference when it comes to facial expressions!
Angles
Draw the head in an angle that matches the expressions you want to make. It is not a requirement, but is going to add to the effect.
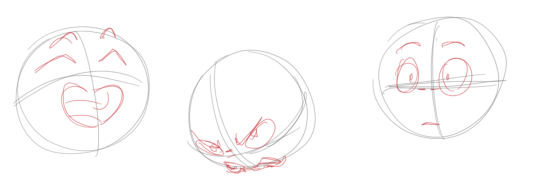
Symmetry vs asymmetry
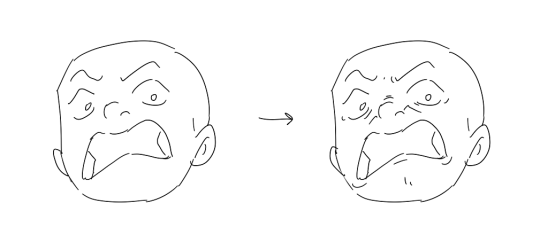
A face is rarely symmetric. Unless the face the character is making is 100 % relaxed or even dissociating, the eyebrows, mouth and facial muscles will have different placements of their respective side. This image shows the dramatic impact asymmetry has on a face:
That’s the difference between a smile and a smirk!
The first one’s like “oh yeah?” and the second is like “oH YEAH??”
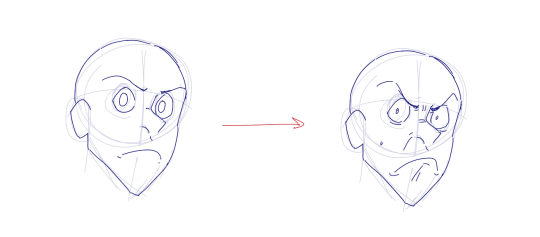
The “balloon squishing principle”
This is something I did subconsciously, and I didn’t know about until I made this tutorial. And this principle goes hand in hand with an asymmetric face. Basically, if you squish one part of the face, you need to even out the empty space by “inflating” the other part of the face so that it doesn’t appear shrunken. The picture hopefully explains it:
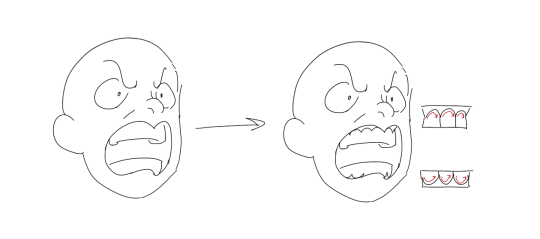
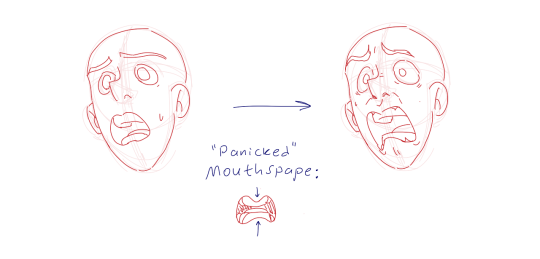
Teeth
Don’t forget to add the gum when the mouth is open to its full potential!
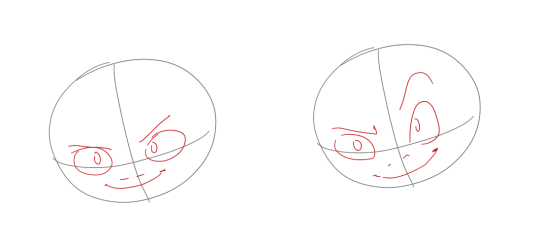
Squinting and folding
Adding folds around the eyes when a character is squinting makes a HUGE difference. It makes a smile more genuine and a growl more intimidating. Adding folds to the face in general makes your characters more lifelike and ‘visually relatable’. Like, they look human, and less plastic or fake.
and so on..
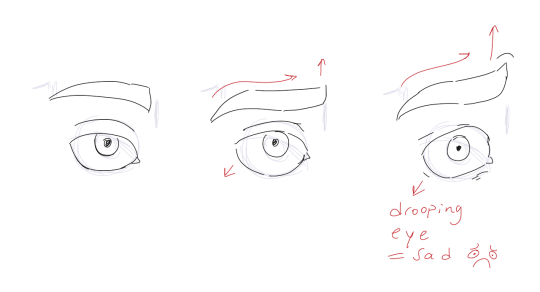
Pupils and irises
The placement of the iris and pupil in relation to the eyelids is very important! The less of the white you see, the more relaxed the character is.
And then of course eyebrows and eyes go hand in hand!
Gestures, spitting, sweating…
Adding more elements than just a face is key to making the character actually look like they are feeling what you want them to feel. Just the tiniest sweat drop adds to their anxiety, spitting adds frustration to their rage, slouching shoulders, waving hands, a double chin, extreme angles, the list goes on! Add whatever and see what kind of impact it makes! Does it do the trick? Great! Add it!
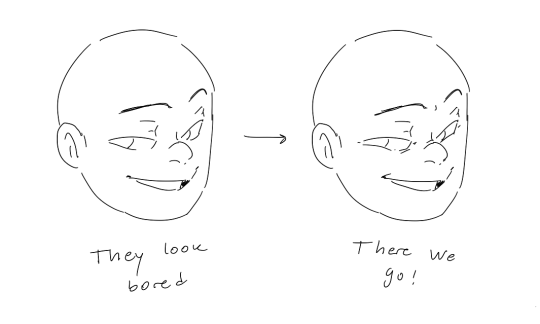
Over exaggeration!!
Remember that you can almost always exaggerate more. Don’t be afraid to do draw “too much” because you’re just experimenting. See what works and what doesn’t. What do you like to exaggerate?
Now that you know some theory, it’s time to practice!
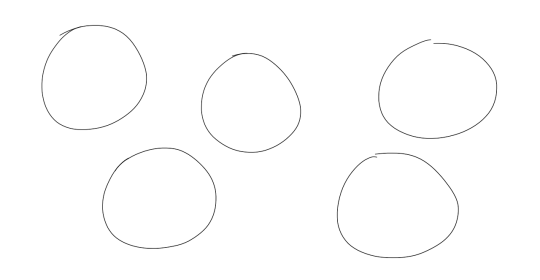
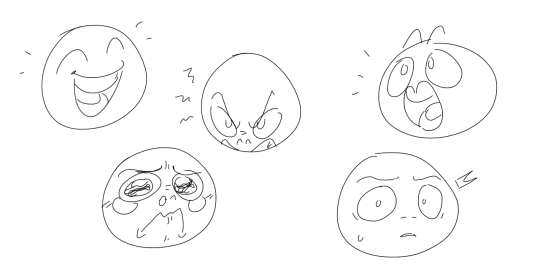
Fill a page with circles and fill them in with different expressions. Try and exaggerate as much as you can!
This is mostly for experimenting. They are quicker to draw than complete faces, but the same rules should apply!
And that’s about it!
I don’t know if I covered everything in this tutorial, since some things might be obvious for me, and this post perhaps only scratches the surface. So feel free to send me a message if you want an explanation about something more in depth! Thank you for reading! And now DRAW!!! ✨🎨
This tutorial contains tips about writing for webcomics, with my caveat that I’m not formally trained in any of this stuff~~ This is all just my personal observations and tips from the past 10 years of putting comics online, but they’ve served me pretty well so far! For some examples of this info applied to my own work, feel free to check out my webcomics at The Meek and Mare Internum.
All of my tutorials are released in lower-res format to the public 6 months after
publication at the Shingworks Patreon. You can access the full tutorial archive, as well as nearly 1.5
years worth of bonus content, by becoming a Patron :] I just wrapped up a two part tutorial about building and launching Patreons, good times.
This is the coloring method I use on both of my comics (Mare Internum and The Meek), and as you can see, you can get a lot of mileage out of this technique!
It’s fast, flexible AND consistent, and you can achieve anywhere from simple cel-shading to complex textured painting… definitely my go-to coloring method for creating nice-looking art with as few layers as possible.
I create these tutorials every month for my Patrons! After six months, a lower res version of the tutorial will go public so everyone can have this info :] As always, you can access the full archive of my tutorial series and the monthly supplement here on the Shingworks Patreon.
And, thanks very much for not deleting this text~~ meow
Ohhh gosh, thank you! I’m glad you like em! I actually don’t do anything too special, but here’s a few tips!
The first thing I focus on is the top lip. The more you focus on the curve, the more variation and form it’s given.
Then, I focus on the lip shape in general. The top lip is actually “darker” than the bottom, because it’s in shadow.
It’s better illustrated in color, and it makes seeing form in it easier and clearer.
Another big aspect I rely on and love to utilize is the gums. Gums are great for giving a very real, tangible, finite look to the teeth, rather than have them stretch endlessly in the mouth. Again, use curves!
Another big thing with the gums, is knowing where the’re at. Think of how the jaw is lowered and raised, rather than the top, which remains static. For the top though, the lip itself can reveal the gums, when stretched.
When expressing emotion, (and I know I bring this up a LOT) exaggerate! Pull the corners back far, show the gums, show the bottom row, move the tongue! Again, use curves! Never keep too static a line, especially in the top lip.
And finally, wrinkles! Use the surrounding skin and flesh I to your advantage! Pull it for age and expression, compress it to show youth, (typically).
Glad to be back at TUTOR TUESDAY, and a big thanks to Paul for taking over for two weeks! Big thanks to @wr3h for todays topic! I’m hoping to branch out more into styles/techniques in photoshop if y’all enjoy how this one went! I’m always open to recommendations, feel free to send them here or to my personal. Keep practicing, have fun, and I’ll see you next Tuesday!
a collection of things i wrote about color. these aren’t necessarily “tutorials", just things i’ve discovered that work for me and might help others. i’m still learning.
With the art tutorials that I’ve seen around the internet that focus on this particular subject I’ve found that some use curvy or spherical shaped objects.
I’ve always found these methods a bit hard to understand for me because I for one CANNOT DRAW FREAKIN EFFORTLESS NATURAL CURVY LINES LET alone DRAW a FREAKIN CIRCLE!!
With this tutorial I’ve stripped it down to the bare essentials.
Poses at these angles are used a lot in animations or comics.
My tutorial for poses viewed at high angles can be found here.
Tutorial for ‘How to draw background perspectives’ is here
E.J Sue’s “Mechaforce” is one of the few “How to Draw” books I would point newbies looking to get into drawing robots to. It emphasises knowing the basics (Very difficult to draw a robot properly if you can’t use perspective) and fundamental shapes and even arm techniques, and gives a neat insight into how mechanical forms work in art.
These are just a few of the examples from the anatomy section of the book. It’s currently on sale on Amazon and worth checking out, though I will note it is not a “be all end all” resource, thankfully you can fill in your knowledge gaps elsewhere.