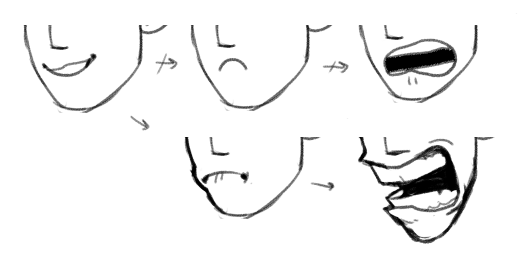
i think a good tip is to learn the different kinds of teeth our mouths hold and then build off of that formula for squish n stretch for cartooning.
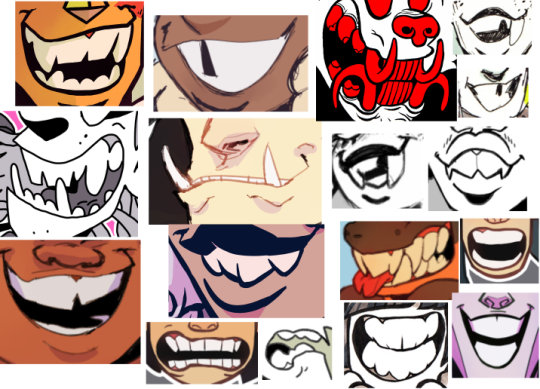
if you wanna draw good monster mouths (or just.. people mouths too), look at actual animal mouths (or people mouths) and what sorta teeth they have and also for what purposes and why specific teeth are designed the way they are in nature. cause i mean… you could always just draw a jagged line for teeth (ie ‘’shark teeth’’) but imo it’s always just… extra nice looking and cool if you actually draw stuff so it makes sense! it shows!
this is a rly good post imo! covers the basics and has nice examples.
another tip is that sometimes simple stuff works best. that’s why i draw just a ‘’slab’’ of white for teeth most of the time, cause especially for people, if you draw every single tooth really detailed, it most often just turns out looking sorta creepy! unless im going for the creepy, i usually leave the teeth in pretty simple, big shapes.
imperfections are interesting! draw that crooked or gapped teeth mouth. missing teeth also add character. there’s… a lot of fun you can have w teeth design alone lol.
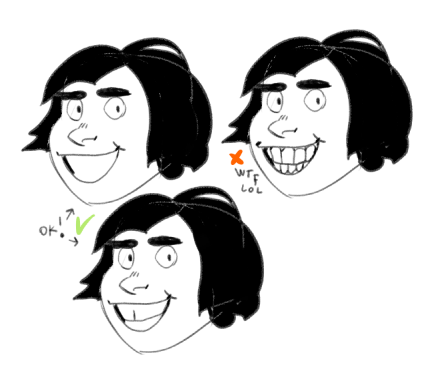
tips for drawing mouths tho…. hmmmm… well. i guess it’s more of a style quirk more than anything but i like to draw mouths that are… more like a hole in the face or something that breaks the face shape rather than just a projection on the surface of the face? if that makes sense lol. i like to draw mouths that the face has to adjust to rather than drawing all sorts of expressions on top of a never changing face shape.
my point being something like this. i feel like this is a ‘’it’s my style’’ kind of a situation so, whatever i guess. it’s not like i choose to use ‘’correct’’ perspective myself most of the time lol. also…. i like to push stuff.. pushing expressions to the extremes doesn’t Always work but boy howdy are they fun to draw lmao..
as to why i draw mouths like i do, my absolute favorite part abt them is that lil shape that they do and i exaggerate it lmao… so i guess my tip here is……… u guessed it………. look at a bunch of photos of people.
iiiii hope any of this is helpful, i feel like i could ramble and preach abt how much teeth give to a character and how fun and important is like… mouth acting or whatever lmao so i will just stop for now. writing down tips is always kinda… very tricky. also art is kinda? subjective? so. take whatever advice you will from this.
hank you, im really glad you like it! I usually use SAI to draw and Adobe Photoshop Elements 2.0 (yes its absolutely ancient i knooow) to add certain effects i cant quite recreate in SAI
to get that fuzzy effect, i have the entire image on one layer and duplicate it, changing the opacity of the copy to around 30-40%
then i hide the copy for a bit, and select the background. there, i apply the “diffuse” filter found right here:
the “lighten only” mode, creates a base to get that “scanned pencil lines” look which helps to make it look more like a screencap of an older anime.
(i found that this works best with clear lines and cell shading)
then, still on the background layer, i get a gaussian blur filter going, found over here:
a radius of 1-2 pixels blurs the whole deal out a little to make it look like its a good ol low quality screencap
then i go back to the other layer and, using the same gaussian blur filter but a radius of 15-20 pixels, get that foggy feel going!
this step is the most important as it creates that dreamy, foggy feeling which helps to make it look like ye olde animes
lastly, i clean up some highlights that might’ve gotten washed away by all the blurring, and we’re done!
of course you can always do more things like add a texture to make it a little grainy, or resize the canvas to fit the average dimensions for most old animes, or do something difficult and technical with the colors which i know nothing about, but i feel like this process is a pretty alright method to satisfy those ~ a e s t h e t i c ~ cravings!
(quick before/after)
i hope this helps, im sorry this turned out so long…..feel free to ask me to clarify if anything isnt clear!
typically these should be in every photoediting/drawing program like photoshop too if u guys are unsure c:
It’s Meg for this week’s TUTOR TUESDAY! Today we look at cars! if you have any recommendations send em in here or my personal. Keep practicing, have fun, and I’ll see you next week!
A compilation of stuff I know about drawing Asian faces and Asian culture! I feel like many “How-To-Draw” tutorials often default to European faces and are not really helpful when drawing people of other races. So I thought I’d put this together in case anyone is interested! Feel free to share this guide and shoot me questions if you have any! I’m by no means an expert, I just know a few things from drawing experience and from my own cultural background.
If you guys notice, I use a ton of different colors. It’s because I always do different color patterns to try different combinations and I was always frustrated cuz I used to reevaluate my drawings to see which colors I’ve already used and which I haven’t. So I ended making a color combo chart in order to guide me in which colors i haven’t done and which I have used too much. Here it is:
The first line (Horizontally) shows the colors that I use at their most basic shade. The ones below them are the the color combos by pair. Here is an example of how I use them in my art as a guide:
If you notice most of my pieces above are centered on those colors but as you’ve read in my other tutorials I base my work on three colors not just two. That’s because the third color is any color that matches the 2 colors given by the color combo chart. Here is an example of how I pattern my artwork on the color combo chart:
1. Orange – The shade is different but it is still classified as orange 2. Violet –
The shade is different but it is still classified as
Violet
3. Extra Color – Red So after each piece, I mark my color combo chart on which pair I used. I guess it’s kinda like color bingo. Anyway hope this was helpful!
thank you! here are some super quick things people may not know going in:
smart objects
masks
clipping masks
layer masks
adjustment layers
liquify, general fliters
blending effects
for layers
for brushes
grids, guides
history/save states/snapshots
importing brushes
workspaces
dark magic
quick exporting
what a contact sheet is
batching, scripts.
this will all be in PhotoshopCC. This is the more technical side of Photoshop instead of the fun drawing side, because let’s face it you’ll already learn that in time. This is stuff to make drawing digitally or editing or whatever easier, faster, and less trouble. These are shortcuts and smart things basically.
smart objects!
touching up? use smart objects!! please!! When you size them down they still maintain the data of the original, so you can scale and re-arrange without data lost (you can’t draw on this layer as a smart object though!). do this please. to undo this look for “rasterize layer”
this also means filters are clipped onto the layer but aren’t actually changing the layer. You can then turn them off, delete them, ect. without any repercussions. Smart objects will be more data but they are safe bets.
you won’t see this for drawing and painting but when you’re editing your drawings for maybe a poster or compiling them this is super useful!